Showing posts with label NURBS. Show all posts

Tuesday, September 9, 2014

WIP, Tuesday, Sept 9th

Well after taking a short break for the weekend (while working on other projects), I've come back to the Starbucks picture.  Right now, I am (finally) done with matching and placing the objects.  At last I've started making the refined models.  I am using a combination of subdiv and polygons (with a few NURBS).  After experimenting with the Maya 2014 feature of creases sets, which I have worked with before, I've found that while they are are useful, not everything supports it properly.  Case in point, I am planning to render this using PR Renderman (whenever Pixar releases it... they said they'd release it at SIGGRAPH but that was a month ago), so while I wait, I am using a copy of another Renderman renderer, 3Delight.  Apparently, it doesn't like crease sets that much, and there have been other issues.  But I can say this, it is a lot better and faster than Mental Ray.  I haven't gotten to texturing or lighting yet, but with a simple test at full resolution, it took Mental Ray about 1 and a half minutes to render the scene, while 3Delight actually added shadows (turning them on on the default lights) and took only 16 seconds to render the same shot.  Much faster.  So right now, I am using 3Delight, but I am hoping PR Renderman comes out soon.

Until then, here are the visual updates:
No wirefreame

With wireframe
As you can see, I have refined the models of the nozzles in the foreground, as well as the lid in the foreground to the left (also added the indents), refined the cups in the tower, remodeled the containers in the center with better lids and more details, as well as the pumps on them, and the handles sticking out of the containers behind them.  I am hoping tomorrow to finish modeling the containers in the stand, the pitchers on top of the larger case, and get cracking on the machine int he background.  One large challenging piece for that will be the odd-shaped structure on the top of it, which I have mainly avoided for the rough placement, but will need to be figured out and addressed soon.  Once that is done, I will do a once over on the models and their placement, and finally get started on shading and texturing.

I also have plans to start modeling a minor character, from Dexter's Laboratory, as a practice on modeling a character and texturing it.  It should be easy, but will let me explore Mari some more.  More on that later.

Thursday, May 30, 2013

Shaders and Textures Final (TECH 311), part 1

Another sleepless night, but that is expected during Finals week at SCAD.

Today, I have for you all my final from my Shaders and Textures class.  In short, this is a class that teaches how to make objects looks really cool with textures and a realistic reaction to light.  So you'd think the final project in this class would involve making some photo-real objects, but it isn't.  In fact, it is quite the opposite.

Our final was to use a non-traditional shading technique to make something that looks 2D in a 3D world.  We aren't talking toon-shaders, but something more advanced.  Our in class assignment was to make it look like a drawing, and still have a reaction to light.  As you can see here, the sketchy pencil marks really help make this scene look drawn, but it is in fact 3D.

So for my project, I decided to do a painting.  Specifically, I wanted to make an homage to one of my favorite artists, Vincent van Gogh, and his most famous painting, Starry Night.  In order to make this project, I got the assistance of my beautiful wife to help me literally paint with Acrylics (because I don't have nor know how to use oil paints) onto Bristol board and scanned into a computer.  I then manipulated the scans, adjusting colors and tiling the images and such.  From there, I input them into Maya, did a lot of adjustments, and placed them inside various procedural textures which add a lot to the render to make it look like more than just a bunch of flat strokes.  The scene I chose to do is, in fact, a direct homage to Starry Night, which is not as well-put-together as I would like, but I will play with that later.

I am also working on animating this scene with a camera pan through the painting.  I tried this already, but I forgot to bake in some of the textures, which messed up the sequence.  Once I fix this as well, I should have a pretty cool short flying out of a painting.

So for now, enjoy my rendition of a 3D Starry Night.


And now... SLEEP!

Thursday, May 2, 2013

Diner

So you remember yesterday how I showed you all a sneak peak of my project for today... well I finished everything and it looks great!  I plan to do more with this though, but I am satisfied with where I got it for now.
In this scene, I modeled the background, the bottles, the cups, the plates, the ketchup  the salt and pepper shakers... pretty much everything except the chairs (which you can barely see), the bottle caps (which I adjusted for my scene), and the flatware (which I also adjusted).  All the textures (with the exception of the photograph in the back) were made by me.  With the exception of the labels, they are all procedural.
This project was specifically designed to show reflection and refraction, which is why almost everything in the scene has some of this on it.
In the future, I plan to adjust the plate thickness, adjust the brightness of the glasses, add some wear and tear, model a booth, fix the background, and give it all new lighting.  I also plan to take this into Nuke, and do some post production composite work on it.
Again these are all NURBS (which the exception of the table and salt shakers, and the things I didn't model), which are really underrated.  NURBS can be used for so many different things, and or really great tools to use, I am surprised more people don't use these.  I would like to learn for Subdivision modeling on my own, but for now, NURBS are doing a fantastic job.  I am also really pleased with the way the table came out and the Coke bottle.  The ketchup was also fun to do and very effective.
So enjoy my newest render.  I will post more when I make edits to it in the future.

Now I'm hungry...


Wednesday, May 1, 2013

Mushroom Madness!

Hey everyone,

Big news today!  I applied to be a student volunteer at SIGGRAPH 2013, and they accepted me!  Not only did they accept me, but they  are going to cover my housing!  This is great news, as this is a perfect opportunity for networking with professionals from all the major and influential companies in animation and visual effects.  The conference will be this July, and will last about a week, in Anaheim, California.

In other news...

Today I have a new project for you, and this one moves... sort of.  It animates at least.  The entire project was about using Autodesk Maya to render out Primary and Secondary passes, and then composite and animation them, post-production style, in Nuke.  Sounds like a bunch of fancy words I'm sure.  In short I am telling my 3D software to render out my scene in pieces, and then I put them back together and make changes to them in the composting software.
So this exercise involved taking existing models of mushrooms and applying up to 3 textures to them, and then adding my own background.  I decided to use an existing background I made before for a different class, and manipulated it for the scene.  I then rendered it in passes, brought it into Nuke, and make the colors change.  I also added the camera move and the depth of field as well in post as well.
While this is a "finished" project, it is not actually finished.  I will be reworking this to fix a bug or two and to enhance some of the effects.  Until then...

Enjoy!


Saturday, April 20, 2013

Mushrooms

Day 2 already, can I keep up this pace?

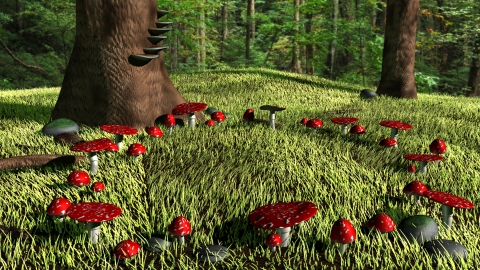
Today I'd like to share an image I created a week or two ago called Fairy Circle. It is really just a ring of Fly Agaric mushrooms, but I put a lot of work into it.

I modified the background plate, modeled all the objects (all are NURBs), experimented with the Maya Fur grass tool, and created all the textures. These are all procedural textures meaning the computer is creating them based on math, and no photographs (except for the plate in the back) were used as textures.

I really like how the tree came out, but I would like to do more with the grass an the ground and the mushrooms. I'd also like to go back and adjust the lights to get a different feel and better contrast and form.

That's all for now, enjoy!